AWS IoT - TLS Client Certificate Authentication
How to generate a client certificate for your Zymkey, register your own CA, and establish a TLS connection to AWS IoT to publish data.
Overview
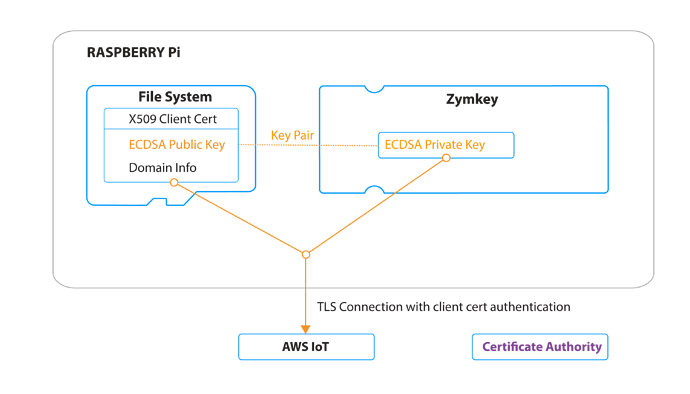
The following post will show you how to create and register a Zymkey Client Certificate for devices connecting to AWS IoT, as well as how to publish data to AWS IoT using Zymkey. This will allow you to connect a client device to AWS IoT using the private key stored in a Zymkey hardware security module, which is inherently a more secure client certification and authentication method.
If you have a large number of client devices to connect to AWS IoT, consider using the more automated Just In Time Registration Process using Zymkey. More details.
AWS IoT uses a certificate based system for its TLS client authentication. This means that any attempted connection to the AWS IoT servers such as when pulling/publishing data, which is done through TLS/HTTPS, requires the client to present a valid client certificate as well as a valid certificate authority certificate. Furthermore the client must be able to prove that they have the private key associated with the provided certificate. Client Certificates are considered valid if they are registered with Amazon.
In this example we will be using AWS IoT’s BYOC (Bring Your Own Certicate) system to create a certificate based on Zymkey’s private key and register it with Amazon. The Zymkey certificate can be signed by either the AWS IoT root certificate authority or your own certificate authority. Both methods will be covered here. Once the setup is complete, you will be able to work with AWS IoT using their REST API, authenticating with Zymkey’s private key.
Classic client TLS authentication requires the user to keep their private key stored in a file, such as in a file called zymkey.key, and the key is read by whatever client is establishing the TLS connection so that it can be used to prove that you own the key.
With Zymkey, authentication is done by a key that cannot be read/exported and that isn’t kept on the file system. The key is always stored in the Zymkey hardware.
Lastly, we will show you how to test your setup. This is done with CURL to make HTTPS requests to the MQTT port 8443.
Prerequisites
- Follow the Installation and Getting Started section for your HSM first.
Have a registered AWS Account, a free developer account can be made here.
Process Overview
- Create a Certificate Signing Request (CSR) with Zymkey private key
- Sign CSR with a Certificate Authority to get a Zymkey Device Certificate
- If using your own Certificate Authority, register it with AWS
- Register the Zymkey Device Certificate with AWS
- Test a TLS connection using your Zymkey Device Certificate and Private Key
- Attach a policy to the Zymkey Device Certificate to allow it to publish data to AWS IoT
- Publish data to AWS IoT over TLS using Zymkey Device Certificate for authentication
Manual vs. Programmatic Setup
Details
All AWS settings can be configured either manually through the AWS web interface or programatically through AWS’ boto 3 module in Python. If you would like to use scripts to programatically set up your client certificate, you will need to do the following steps.
First, follow these instructions on the boto3 page to set up the boto3 module for Python: http://boto3.readthedocs.io/en/latest/guide/quickstart.html
The boto3 module authenticates with AWS based on a IAM Access ID and Secret Key. The boto3 tutorial will ask you to setup an IAM user, here are some instructions on how to do so:
- From the AWS console, choose the IAM service.
- Go to Users and select Add User
- Choose a username and check the Programmatic access box
- For simplicity, choose Attach existing policies directly and select AdministratorAccess
- If you wish to better manage your IAM credentials, feel free to customize your Access Policy.
- Click Review and then Create User
- Save the Access ID and Secret Key and follow the boto3 guide.
Creating a Certificate Signing Request with Zymkey
Bring Your Own device Certificate (BYOC)
The first step is to create a valid device certificate using Zymkey’s private key. This can be done by first creating a Certificate Signing Request using OpenSSL:
openssl req -key nonzymkey.key -new -out zymkey.csr -engine zymkey_ssl -keyform e -subj "/C=US/ST=California/L=Santa Barbara/O=Zymbit/OU=Zymkey/CN=rpi.edge.zymbit.com"
The file nonzymkey.key is a placeholder argument and is not actually a real file or used since Zymkey’s private key can not be exported nor read. A CSR file zymkey.csr is created in the directory where this command is run. The -subj argument automatically inserts certificate information, but you can leave this argument out and will be prompted to input your own information. Your CSR now needs to be signed by a valid Certificate Authority.
Registering a Certificate Authority
Now that you have created a CSR with Zymkey, you have two options for Certificate Authorities.
Option A - Using the AWS IoT Root Certificate Authority (Easiest)
Details
Signing CSR with AWS’ Certificate Authority
Using AWS’ Certificate Authority is the easier option in terms of setup and allows you to use a trustworthy Certificate Authority that Amazon uses its services. The following steps show you how to sign your Zymkey’s private key with Amazon’s CA and get a valid device certificate:
Manually:
- Sign into your AWS console. Here is a link to the console sign-in page: https://aws.amazon.com/console/
- From the console, select the AWS IoT Core service
- Under the secure tab, click on Certificates and click the blue Create a certificate bar
- Choose the Create with CSR option
- When the File Selection menu pops up point to your CSR file. It shoud be
zymkey.csrby default. Choose Upload file. We created this file on your IoT device, you may need to transfer it to where your logged into AWS. - Download the Certificate file on the next screen and save as
zymkey.crt. If you are not logged into AWS from your IoT device, transfer the file to your IoT device. We will use this later. - You also need to download the root CA for AWS IoT, by clicking Download. On the page that opens, scroll down to the section CA certificates for server authentication, click ECC 256 bit key and click on the adjacent link Amazon Root CA 3. Copy the public key into a file named
AWS_CA.pemfile. If you are not logged into AWS from your IoT device, transfer AWS_CA.pem to your IoT device. We will use this later. - Return to the Create Certificate AWS IoT page and click Activate
Programatically:
Using the boto3 client, this python script will read the csr file zymkey.csr, give it to AWS to sign with their Certificate Authority, and create a signed certificate zymkey.crt in the directory where this program is run. Furthermore the certificate will be automatically registered and activated with AWS IoT and will be ready for use.
import boto3

iot_client = boto3.client('iot')
with open('zymkey.csr', 'r') as zymkey_csr_file:
	zymkey_csr = zymkey_csr_file.read()

zymkey_cert = iot_client.create_certificate_from_csr(
	certificateSigningRequest=zymkey_csr,
	setAsActive=True
)

with open('zymkey.crt', 'w') as zymkey_cert_file:
	zymkey_cert_file.write(zymkey_cert['certificatePem'])
Save the above script into a file called aws_sign_csr.py and run with the following command:
python aws_sign_csr.py
Now that your Certificate has been signed and activated by AWS IoT, it can be used to establish a TLS connection with the AWS IoT servers. Skip down to Testing the TLS Connection section to continue.
Option B - Using your own Certificate Authority
Details
AWS IoT also allows you do you use own Certificate Authority as long as you register it with them. This constitutes proving you own the private key to the CA by signing a verification CSR that includes a registration code.
If you already have a Certificate Authority that you would like to use, you can ignore the next part. Here we create an example Certificate Authority using OpenSSL.
Creating an example CA with OpenSSL
#!/bin/bash
set -e
mkdir CA_files
cd CA_files

openssl ecparam -genkey -name prime256v1 -out zk_ca.key
OPENSSL_CONF=/etc/ssl/openssl.cnf openssl req \
  -x509 -new -SHA256 -nodes -key zk_ca.key \
  -days 3650 -out zk_ca.crt \
  -subj "/C=US/ST=California/L=Santa Barbara/O=Zymkey/CN=zymkey-verify.zymbit.com.dev"

cp zk_ca.crt zk_ca.pem
Copy the above lines into a script called mk_ca.sh. You can then run the script in the command line by being in the same directory with the following command:
bash mk_ca.sh
The script will create a directory called CA_files and a couple of files:
zk_ca.key: Private key for the created CA, will be supplied to OpenSSL for signing CSRs.
zk_ca.pem: PEM formatted certificate for the CA
zk_ca.crt: Same file as zk_ca.pem
Signing CSR with Certificate Authority
Next we will be signing the Zymkey CSR with your chosen Certificate Authority.
#!/bin/bash
set -e

SCRIPT_NAME=$(basename $0)

[ -z $2 ] && echo "${SCRIPT_NAME} <csr filename> <crt filename>" 1>&2 && exit 1

csr=$1
crt=$2
openssl x509 -req -SHA256 -days 3650 \
  -CA CA_files/zk_ca.crt -CAkey CA_files/zk_ca.key -CAcreateserial \
  -in ${csr} -out ${crt}
Copy the above lines into a script called sign_csr.sh. The first argument is the relative or absolute path of your csr file, such as zymkey.csr. The second argument is what you want to name the certificate file of the signed cert. Change the -CA and -CAkey file path, can be relative or absolute, if you are using your own CA. You can then run the script in the command line by being in the same directory with the following command:
bash sign_csr.sh zymkey.csr zymkey.crt
Registering Your Certificate Authority with AWS
You now have a valid certificate, zymkey.crt signed by the Certificate Authority of your choice. If you are using your own Certificate Authority, you have to register your Certificate Authority with Amazon’s IoT service so that AWS IoT will accept certificates signed by that Certificate Authority.
Manually:
- From the AWS IoT console select Secure, then click CAs and then click Register
- Click Register CA
- Follow Steps 1 through 3 on the next screen to create a verification certificate.
- When signing the verification certificate with your CA in Step 4 run the following command:
openssl x509 -req -in verificationCert.csr -CA CA_files/zk_ca.pem -CAkey CA_files/zk_ca.key -CAcreateserial -out verificationCert.crt -days 500 -sha256
Note that if you use a different CA and not the demo one we generated, change the **-CA** and **-CAkey** paths appropriately.
- Step 5: click Select CA certificate and point to the correct .pem file. If you use the OpenSSL generated SSL point to CA_files/zk_ca.pem
- Step 6: click Select verification certificate and point to verificationCert.crt which was created in Step 4.
- Select Activate CA certificate and Enable auto-registration of device certificates
- Click Register CA certificate button.
Programatically:
The following python script will automatically create a verification cert with a registration code and automatically activate your Certificate Authority. While it may look a bit intimidating, all you have to worry about is the very last line, where you can change to point to your CA files.
import OpenSSL
import boto3
import os

def gen_AWS_verification_csr(registrationCode):
	key = OpenSSL.crypto.PKey()
	key.generate_key(OpenSSL.crypto.TYPE_RSA, 2048)
	req = OpenSSL.crypto.X509Req()
	req.get_subject().CN = registrationCode
	req.set_pubkey(key)
	req.sign(key, "sha256")
	return OpenSSL.crypto.dump_certificate_request(OpenSSL.crypto.FILETYPE_PEM, req)

def sign_CSR_with_CA(verification_csr, CA_cert_path, CA_key_path):
	ca_cert = OpenSSL.crypto.load_certificate(OpenSSL.crypto.FILETYPE_PEM, open(CA_cert_path).read())
	ca_key = OpenSSL.crypto.load_privatekey(OpenSSL.crypto.FILETYPE_PEM, open(CA_key_path).read())
	req = OpenSSL.crypto.load_certificate_request(OpenSSL.crypto.FILETYPE_PEM, verification_csr)
	cert = OpenSSL.crypto.X509()
	cert.set_subject(req.get_subject())
	cert.set_serial_number(1)
	cert.gmtime_adj_notBefore(0)
	cert.gmtime_adj_notAfter(24 * 60 * 60)
	cert.set_issuer(ca_cert.get_subject())
	cert.set_pubkey(req.get_pubkey())
	cert.sign(ca_key, "sha256")
	return OpenSSL.crypto.dump_certificate(OpenSSL.crypto.FILETYPE_PEM, cert)

def register_CA_AWS(CA_cert_path, CA_key_path):
	client = boto3.client('iot')

	response = client.get_registration_code()
	registration_key = response['registrationCode']

	verification_pem = gen_AWS_verification_csr(registrationCode=registration_key)
	verification_cert = sign_CSR_with_CA(verification_csr=verification_pem, CA_cert_path=CA_cert_path, CA_key_path=CA_key_path)

	response = client.register_ca_certificate(
		caCertificate=open(CA_cert_path).read(),
		verificationCertificate=verification_cert,
		setAsActive=True,
		allowAutoRegistration=True
	)

	return response

register_CA_AWS(CA_cert_path='CA_files/zk_ca.crt', CA_key_path='CA_files/zk_ca.key')
Copy the above lines into a file called activate_aws_ca.py and run with the following command:
python activate_aws_ca.py
Registering a Device Certificate signed by Certificate Authority
Now that your Certificate Authority has been registered with AWS IoT, all that is left to do is to register and activate your Zymbit device certificate.
Details
Manually:
- From the AWS IoT Console click Secure, then Certificates and then click the blue Create button
- Under Use My Certificate click the Get Started button
- If you registered your own CA, choose the CA you registered on the Select a CA screen, then click Next
- Click Select certificates and navigate to the certificate that was signed by your CA. Its default name is
zymkey.crt - Make sure to check the Activate all circle on the certificate box, and finally click the blue Register certificates button.
Programatically:
The same thing can be done in Python. Just change the last line to point to your CA_Path and Cert_Path, the paths can be either relative or absolute. For example if the two certificate files: zk_ca.crt and zymkey.crt are in the same directory as the Python script, you don’t have to change anything from the following:
import boto3
import OpenSSL

def activate_cert_AWS(CA_path, Cert_path):
	boto3client = boto3.client('iot')
	with open(CA_path) as CA_file:
               CA_Pem = CA_file.read()
        with open(Cert_path) as Cert_file:
                Cert_Pem = Cert_file.read()
        return boto3client.register_certificate(
		certificatePem=Cert_Pem,
		caCertificatePem=CA_Pem,
		setAsActive=True,
	)

activate_cert_AWS(CA_path='CA_files/zk_ca.crt', Cert_path='zymkey.crt')
Copy the above lines into a file called activate_aws_cert.py and run with the following command: Change the CA_Path and Cert_path if necessary.
python activate_aws_cert.py
Testing TLS connection with Zymkey Device Certificate:
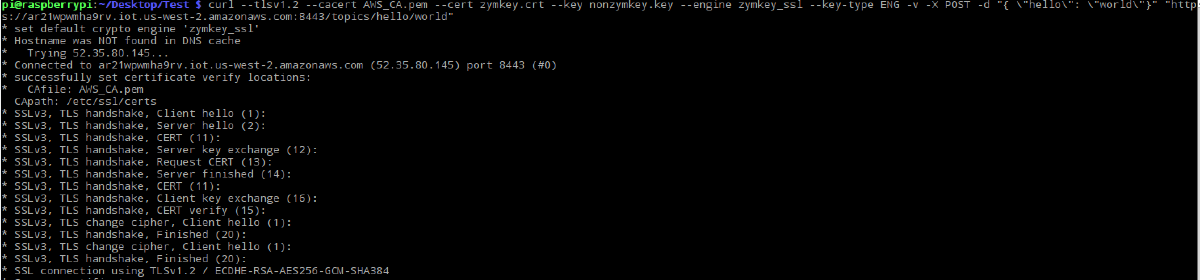
You can now test that your certificate zymkey.crt has been registered correctly by testing a TLS connection with your AWS IoT endpoint. We will be doing this with CURL.
Details
The first thing to do is to look for your AWS endpoint:
From the AWS IoT console screen, click on Settings in the left hand bar.
In the Device data endpoint section, copy the Endpoint.
Replace endpoint.iot.region.amazonaws.com with the Endpoint you just copied in the following command. Now run the command, making sure to do it in the same directory where you keep your signed certificate,
zymkey.crtand your CA cert/pem file,AWS_CA.pem, orCA_files/zk_ca.pem:#replace endpoint iot region with the copied endpoint ```bash curl --tlsv1.2 --cacert AWS_CA.pem --cert zymkey.crt --key nonzymkey.key --engine zymkey_ssl --key-type ENG -v -X POST -d "{ \"hello\": \"world\"}" "https://endpoint.iot.region.amazonaws.com:8443/topics/hello/world" ```
Optionally, you can set an environment variable specifying the slot to use. For the HSM6, you will need to specify the variable prior to running the curl command:
export ZK_SSL_SLOT=0
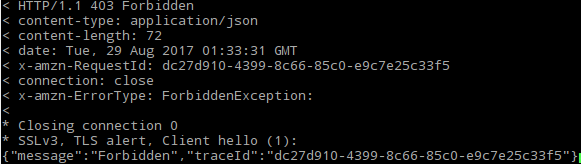
You should see a successful TLS connection, but receive a 403 Forbidden Exception from AWS. This is because the certificate you registered, zymkey.crt doesn’t have the appropriate permissions to publish a message to the topic hello/world. We can fix this by adding a policy and attaching it to the certificate.
Here’s what the successful TLS connection looks like:
Here’s the 403 exception you should receive:
Attaching Policy to Certificate and Publishing to AWS IoT
Details
Here we will attach a Policy to your Zymkey certificate that allows it to publish data to any topic on AWS IoT.
From the AWS IoT console click on Secure and then Policies. Click the blue Create a policy button.
Give your Policy an appropriate name.
Under Action, write the following:
iot:Connect, iot:PublishFor Resource ARN write:
*Check the Allow box, and click Create
Now, click the Certificates tab on the left and click on the … option on the top right corner of your certificate. Select Attach Policy
Attach the appropriate policy and you are done.
Publishing data to AWS IoT
Details
Now the previous command should work and {“hello”: “world”} should be published to the hello/world topic on your AWS IoT endpoint.
On the AWS IoT console and the left hand bar, click on the Test option, and then the MQTT test client option.
In the Subscribe to a topic tab, in the Subscription topic box, type in hello/world. Click the Subscribe button
Test your TLS connection with the following CURL command pointing to the CA cert/pem file and your Zymkey certificate:
#replace endpoint.iot.region with the appropriate values
curl --tlsv1.2 --cacert CA_files/zk_ca.pem --cert zymkey.crt --key nonzymkey.key --engine zymkey_ssl --key-type ENG -v -X POST -d "{ \"hello\": \"world\"}" "https://endpoint.iot.region.amazonaws.com:8443/topics/hello/world"
If it works, your command line should have indication of successful TLS connection and “hello”: “world” should show up in your subscribed topic.