AWS IoT - Just in Time Registration of Client Certificates using Lambda functions
How to automatically generate a client certificate, register your own CA, and authenticate a device to establish a TLS connection to AWS IoT
Overview
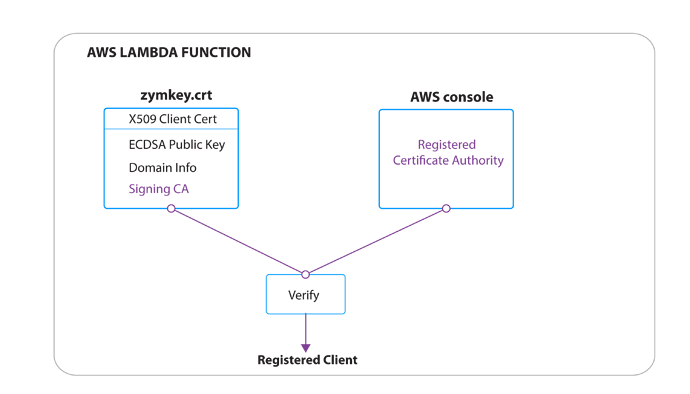
AWS IoT requires an IoT device to register and activate a certificate with AWS before communicating. For large scale deployments, AWS provides an automated process called Just-In-Time-Registration. This allows a user to register a Certificate Authority with AWS so that upon a device’s first TLS connection to AWS servers, if the device certificate was signed by this Certificate Authority, the certificate will be quickly activated by a lambda-function and be ready to use.
Prerequisites:
- Follow the Installation and Getting Started section for your HSM first.
Programmatic Setup
If you would like to use scripts to register your CA and Lambda function, there are a couple more things to set up. We recommend following the manual approach if your only doing this once or twice.
Details
Follow these instructions to set up the boto3 module for Python:
The boto3 module authenticates with AWS based on a IAM Access ID and Secret Key. The boto3 tutorial will ask you to setup an IAM user, here are some instructions on how to do so:
- From the AWS console, choose the IAM service.
- Go to Users and select Add User
- Choose a username and check the Programmatic access box
- For simplicity, choose Attach existing policies directly and select AdministratorAccess
- If you wish to better manage your IAM credentials, feel free to customize your Access Policy.
- Click Review and then Create User
- Save the Access ID and Secret Key and follow the boto3 guide.
Register Certificate Authority with AWS
The following section will show how to generate your own CA using OpenSSL and register it with your AWS account.
Details
Create CA
Copy the lines below into a script called mk_ca.sh.
#!/bin/bash
set -e
mkdir CA_files
cd CA_files

openssl ecparam -genkey -name prime256v1 -out zk_ca.key
OPENSSL_CONF=/etc/ssl/openssl.cnf openssl req \
  -x509 -new -SHA256 -nodes -key zk_ca.key \
  -days 3650 -out zk_ca.crt \
  -subj "/C=US/ST=California/L=Santa Barbara/O=Zymkey/CN=zymkey-verify.zymbit.com.dev"

cp zk_ca.crt zk_ca.pem
You can then run the script in the command line by being in the same directory with the following command:
bash mk_ca.sh
The script will create a directory called CA_files and a couple of files: zk_ca.key: Private key for the created CA, will be supplied to OpenSSL for signing CSRs. zk_ca.pem: PEM formatted certificate for the CA zk_ca.crt: Same file as zk_ca.pem
Register CA with AWS
Manually:
From the AWS IoT console select Secure then CA and then click Register
Click register CA
Follow the directions on the following screen to create a verification certificate.
When signing the verification certificate with your CA in Step 4 run the following command:
openssl x509 -req -in verificationCert.csr -CA CA_files/zk_ca.pem -CAkey CA_files/zk_ca.key -CAcreateserial -out verificationCert.crt -days 500 -sha256Note that if you a different CA and not the demo one we generated, to change the -CA and -CAkey paths appropriately.
Click Select CA certificate and point to the correct .pem file. If you use the OpenSSL generated SSL point to CA_files/zk_ca.pem
Click Select verification certificate and point to verificationCert.crt which was created in Step 4.
Select Active CA certificate and Enable auto-registration of device certificates
Programatically: The following python script will automatically create a verification cert with a registration code and automatically active your Certificate Authority. While it may look a bit intimidating, all you have to worry about is the very last line, where you can change to point to your CA files.
import OpenSSL
import boto3
import os

def gen_AWS_verification_csr(registrationCode):
	key = OpenSSL.crypto.PKey()
	key.generate_key(OpenSSL.crypto.TYPE_RSA, 2048)
	req = OpenSSL.crypto.X509Req()
	req.get_subject().CN = registrationCode
	req.set_pubkey(key)
	req.sign(key, "sha256")
	return OpenSSL.crypto.dump_certificate_request(OpenSSL.crypto.FILETYPE_PEM, req)

def sign_CSR_with_CA(verification_csr, CA_cert_path, CA_key_path):
	ca_cert = OpenSSL.crypto.load_certificate(OpenSSL.crypto.FILETYPE_PEM, open(CA_cert_path).read())
	ca_key = OpenSSL.crypto.load_privatekey(OpenSSL.crypto.FILETYPE_PEM, open(CA_key_path).read())
	req = OpenSSL.crypto.load_certificate_request(OpenSSL.crypto.FILETYPE_PEM, verification_csr)
	cert = OpenSSL.crypto.X509()
	cert.set_subject(req.get_subject())
	cert.set_serial_number(1)
	cert.gmtime_adj_notBefore(0)
	cert.gmtime_adj_notAfter(24 * 60 * 60)
	cert.set_issuer(ca_cert.get_subject())
	cert.set_pubkey(req.get_pubkey())
	cert.sign(ca_key, "sha256")
	return OpenSSL.crypto.dump_certificate(OpenSSL.crypto.FILETYPE_PEM, cert)

def register_CA_AWS(CA_cert_path, CA_key_path):
	client = boto3.client('iot')

	response = client.get_registration_code()
	registration_key = response['registrationCode']

	verification_pem = gen_AWS_verification_csr(registrationCode=registration_key)
	verification_cert = sign_CSR_with_CA(verification_csr=verification_pem, CA_cert_path=CA_cert_path, CA_key_path=CA_key_path)

	response = client.register_ca_certificate(
		caCertificate=open(CA_cert_path).read(),
		verificationCertificate=verification_cert,
		setAsActive=True,
		allowAutoRegistration=True
	)

	return response

register_CA_AWS(CA_cert_path='CA_files/zk_ca.crt', CA_key_path='CA_files/zk_ca.key')
Copy the above lines into a file called activate_aws_ca.py and run with the following command:
python activate_aws_ca.py
Generate Zymkey Certificate
The first thing we will do is generate a device certificate using Zymkey’s private key. We will watch as this certificate gets activated on your AWS IoT console automatically on first connect. Make sure that you do not already have a Zymkey certificate registered on your AWS IoT console.
Generate a Certificate Signing Request with Zymkey’s private key using the following command:
openssl req -key nonzymkey.key -new -out zymkey.csr -engine zymkey_ssl -keyform e -subj "/C=US/ST=California/L=Santa Barbara/O=Zymbit/OU=Zymkey/CN=rpi.edge.zymbit.com"
Note that the -subj line can be omitted or modified with your own information. If it is omitted, you will be prompted to enter your information on the command line.
Signing the CSR to get a valid Zymkey certificate:
Next we’ll sign this CSR with your Certificate Authority. Save the following script in a file called sign_csr.sh. Make sure to change the -CA and -CAkey paths to point to the private key and certificate file for your certificate authority:
#!/bin/bash
set -e

SCRIPT_NAME=$(basename $0)

[ -z $2 ] && echo "${SCRIPT_NAME} <csr filename> <crt filename>" 1>&2 && exit 1

csr=$1
crt=$2
openssl x509 -req -SHA256 -days 3650 \
  -CA CA_files/zk_ca.crt -CAkey CA_files/zk_ca.key -CAcreateserial \
  -in ${csr} -out ${crt}
Now run the script with the following command, where the first argument is the path to your CSR and the second argument the name you wish to give the signed Zymkey Certificate file.
bash sign_csr.sh zymkey.csr zymkey.crt
Creating the Lambda function
Now we need to create and register the lambda function that will activate new certificates on your AWS account. This can be done either manually or programatically in Python. We’ll start with the Manual method as it is simpler and more straightforward.
Details
Manually:
- From your AWS console, sign in here, choose the Lambda service.
- From the Lambda console, click on the orange Create Function button.
- Click the Author from Scratch button.
- Choose an appropriate function name and description. We will be using Node.js 12.x for the runtime environment.
- Click Create function.
- Copy the default JITR code from AWS located here into index.js under Function code (If pasting doesn’t work in their IDE, try Shift+Insert). Make sure that you change the region defined in the code to the appropriate value.
- Now scroll to the top and click the Permissions tab.
- Under Execution role, click Edit.
- There should be an existing role listed under Existing role. Click the blue title View the role on the IAM console.
- This should take you to the IAM console. Click Attach policies
- Click Create policy, then the JSON tab.
- Input the following policy
{
   "Version":"2012-10-17",
   "Statement":[
      {
         "Effect":"Allow",
         "Action":[
            "logs:CreateLogGroup",
            "logs:CreateLogStream",
            "logs:PutLogEvents"
         ],
         "Resource":"arn:aws:logs:*:*:*"
      },
      {
         "Effect":"Allow",
         "Action":[
            "iot:UpdateCertificate",
            "iot:CreatePolicy",
            "iot:AttachPrincipalPolicy"
         ],
         "Resource":"*"
      }
   ]
}
- Click Review policy.
- Give the policy an appropriate name (maybe JITR) and click Create policy.
- On the left hand bar, click Roles.
- Click on your lambda role name. It should start with the function name you defined in step 4, followed by role, then some random characters.
- Click Attach policies.
- Click the box next to the policy we just created in step 14.
- Click Attach policy.
- Click the X to the right of the old policy titled AWSLambdaBasicExecutionRole, and click Detach.
Programatically: The creation of an AWS lambda function through python scripts is a little more intricate than the manual proccess and will need to be divided into numerous parts. The creation of the lambda function will be divided into these steps:
- Creating a new IAM role for the lambda function.
- Creating a new Policy for this IAM role.
- Attaching the Policy to the IAM role.
- Create the lambda function, attaching the IAM role to this function.
<details=“Details”>
Creating IAM Role for the Lambda function
The first thing we need to do is create an IAM Role. This role gives the Lambda function permission to execute and perform its registration of new certificates.
Creating this IAM role furthermore requires you to specify 2 things:
IAM Trust Document: This is a document that details what AWS resources are allowed to assume this IAM role. Below is an example IAM trust document we will use that allows lambda services to assume this JITR role. Save the document in a file called trust_document.txt.
{
  "Version": "2012-10-17",
  "Statement": [
    {
      "Effect": "Allow",
      "Principal": {
        "Service": "lambda.amazonaws.com"
      },
      "Action": "sts:AssumeRole"
    }
  ]
}
Role Policy: This is a document describing what actions an IAM role may take. This policy is created and then attached to whatever role you wish. The following policy will allow the JITR role to create AWS logs as well as register/activate new certificates and attach policies to them. Save the document in a file called policy_document.txt.
{
   "Version":"2012-10-17",
   "Statement":[
      {
         "Effect":"Allow",
         "Action":[
            "logs:CreateLogGroup",
            "logs:CreateLogStream",
            "logs:PutLogEvents"
         ],
         "Resource":"arn:aws:logs:*:*:*"
      },
      {
         "Effect":"Allow",
         "Action":[
            "iot:UpdateCertificate",
            "iot:CreatePolicy",
            "iot:AttachPrincipalPolicy"
         ],
         "Resource":"*"
      }
   ]
}
Finally, this is the python code that will take care of the creation of the IAM role. The first thing it does is create an IAM role with the specified Trust settings. Then it creates an IAM policy with the aforementioned policy settings. Finally it will attach the policy to the role. This role will be used by the JITR lambda. By default it’ll read the two documents trust_document.txt and policy_document.txt from the same directory that the code is executed in. So save the python script in a file called create_jitr_lambda.py in the same directory as these files, or modify the path to these files in the code. They can be either relative or absolute
import boto3

iam_client = boto3.client('IAM')
with open('trust_document.txt') as trust_role:
	trust_document = trust_role.read()

with open('policy_document.txt') as policy:
	policy_document = policy.read()

# Creating the IAM role with the specified Trust
create_role_response = iam_client.create_role(
	RoleName='jitr_role',
	AssumeRolePolicyDocument=trust_document,
	Description='AWS Role given to the JITR lambda'
)

# Creating the IAM policy with the specified P
create_policy_resopnse = iam_client.create_policy(
	PolicyName=policy_name,
	PolicyDocument=policy_document,
	Description'Policy that allows JITR lambda to execute actions.'
)

# Attaching the IAM policy to the IAM role
attach_response = iam_client.attach_role_policy(
	RoleName=role_name,
	PolicyArn=create_policy_response['Policy']['Arn']
)
After saving the code in a file called create_jitr_lambda.py, you can execute by running the following command:
python create_jitr_lambda.py
Creating Lambda function
The lambda function will then be created with the following script. The code for the lambda function will be in a zipped file named jitr_lambda.zip. Download the lambda code here and make sure to modify the region-name in the code to your approrpiate region.
Next, zip up the code in a file called jitr_lambda.zip and keep it in the same directory as the following python script.
#Download the zip file with the lambda code and save it in the same directory as this script.
with open('jitr_lambda.zip', mode='rb') as file:
	filecontent = file.read()

lambda_client = boto3.client('lambda')
create_lambda_response = lambda_client.create_function(
	FunctionName='jitr-lambda',
	Runtime='nodejs4.3',
	#By appending this script unto create_jitr_lambda.py you do not need to find the role_ARN, as it will already be stored in this object.
	Role=attach_response['Arn']
	Handler='index.handler	',
	Code={
		'ZipFile': filecontent
	},
	Description='Lambda function for Just-in-time-Registration',
)
Note that this script requires the Role ARN for the IAM role you just created. If you append this script to the file create_jitr_lambda.py, it will already be included in the response from attaching the policy to the jitr_role, and you won’t have to do anything.
#Do not copy and run these lines, this is just showing where the role_ARN was taken from
attach_response = iam_client.attach_role_policy(
	RoleName=role_name,
	PolicyArn=create_policy_response['Policy']['Arn']
)
role_ARN = attach_response['Arn']
Otherwise, if you don’t wish to append the following script to the create_jitr_lambda.py, here is how you can find the appropriate role_arn:
- From your AWS Console choose the IAM service.
- On the left hand bar, click on Roles
- Select the role titled jitr_role.
- Copy the section following Role ARN
- In the following python script, replace: Role=attach_resopnse[‘Arn’] with Role=the_correct_role_arn
Save the script in an appropriate location, and run it.
Creating the AWS IoT Rule
Finally we will be setting up an AWS IoT Rule to forward all requests with an unregistered certificate to the lambda function that will activate the certificate.
First we need our caCertificateID
- Under Secure click CAs.
- Click on the CA Certificate you created earlier.
- Under the CA Certificate ARN, copy the last section of characters possesing your CA Certificate ID.
arn:aws:iot:us-east-2:302973482904:cacert/<caCertificateID>
Now to create the rule
- From your AWS Console, click on the AWS IoT service.
- On the left hand side, select Act and then click Rules.
- Click Create then give an appropriate Name and Description.
- Using SQL version 2016-03-23 use the following Rule query statement:
SELECT * FROM '$aws/events/certificates/registered/<caCertificateID>'
- Click Add action.
- Click Send a message to a Lambda function and Configure Action.
- Select your lambda function and click Add action.
- Finally click Create rule.
Testing JITR with TLS Connection
You can now test your JITR setup by doing a TLS connection with your AWS IoT endpoint and presenting your Zymkey device certificate.
Details
The first thing to do is to look for your AWS endpoint.
From the AWS IoT console screen, click on the gear that says Settings on the left hand bar.
Copy the link in the Custom Endpoint box.
Now on the left hand bar, click on the Test option.
Under Subscribe and Subscription Topic, type in hello/world.
Test your TLS connection with the following CURL command pointing to your CA file and your Zymkey certificate:
Use CURL to test your TLS connection, pointing to your CA file:
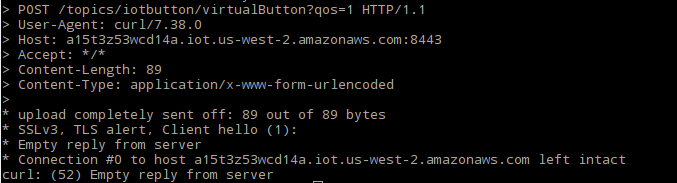
curl --tlsv1.2 --cacert zk_ca.pem --cert zymkey.crt --key nonzymkey.key --engine zymkey_ssl --key-type ENG -v -X POST -d "{ \"hello\": \"world\"}" "https://endpoint.iot.region.amazonaws.com:8443/topics/hello/world"
The TLS connection should go through, and you should see something like this in your command line:

On first connection TLS connection, the TLS handshake should finish, but you should receive empty response from server:
On second TLS connection, you will see that the certifiacte is registered and you will get a correct response:
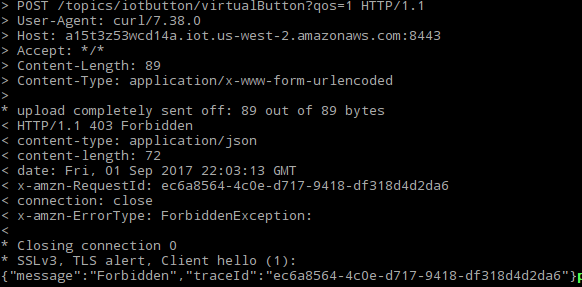
You can also check under your certifiactes in your AWS IoT console to see that the new certifciacte is indeed registered. Getting a non-empty response indicates that the certificate is indeed registerd on you AWS account. However, even though the certificate is activated, it does not have a valid policy granting it permission to publish data to your AWS IoT account, which results in the forbidden response. Fortunately you can always modify the jitr lambda function to attach an appropriate policy to the certificate upon registration/activation if you wish to do so.