How to Integrate Zymbit with AWS Credentials Provider
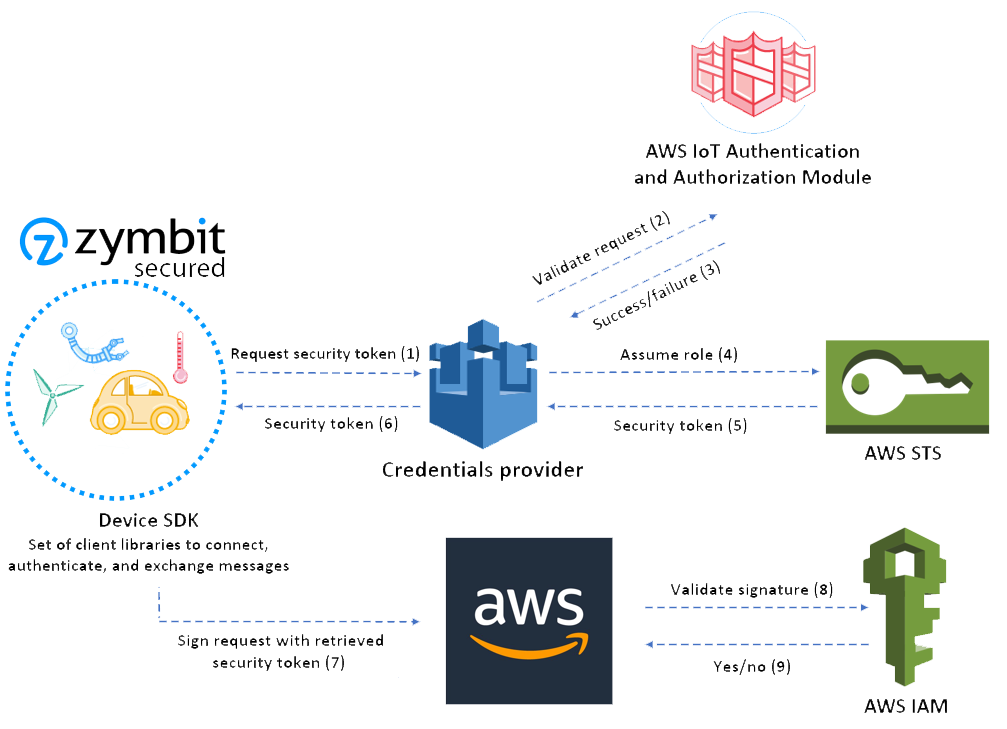
The AWS Credentials provider can give a remote device AWS credentials if it has a valid certificate. The device certificate is stored inside AWS IoT’s service and can be revoked, deactivated or deleted at any time. AWS IoT can also record and index individual IoT Things within a fleet. Each IoT thing will have its own unique certificate verified by AWS, and can be given unique attributes to identify each device along with policies which control the approved actions of each device.
Using AWS IoT also allows device data to be used by other AWS cloud services. Once the device is given credentials, other AWS services can be configured to receive data from the device.
The IoT device’s AWS credentials are only valid for a period of time. If the credentials expire, when the AWS CLI tries to connect to AWS servers, it will run an installed script to get new credentials.
Device Setup
There are four devices in the provisioning process:
- The Provisioning Device with AWS CLI installed (usually your PC)
- The Certificate Authority
- The AWS Credentials Provider
- The IoT Device(s) getting their credentials (with Zymbit security module(s) installed)
If wanted, the CA and provisioning device can be on the same device.
Setup the Provisioning Device
The provisioning device can be any device with AWS CLI installed, but we recommend it not be an IoT device you deploy because the provisioning device will have more AWS permissions.
- Install AWS CLI.
- Instructions here: https://aws.amazon.com/cli/
- Specify user for AWS CLI
- Go to AWS IAM console, click users, add user, input a user name, and check programatic access.
- Click Next:Permissions, “Attach existing policies directly”, click AdministratorAccess
- Click Next:Tags, Next:Review, Create user. Stay on this page.
- On the provisioning device, run
aws configureand fill in the appropriate values from the AWS page.- For Default output format put json.
- Run
git clone https://github.com/zymbit-applications/aws-credentials-provider.git - Run
sudo mkdir /opt/zymbit
Setup the Certificate Authority
The Certificate Authority can be a private CA you own or you can use AWS’s CA service. If you want to create a CA on your own device, follow these instructions.
Create a private CA
On the device you want to hold your private CA and sign certificate requests, do the following.
- Run
git clone https://github.com/zymbit-applications/aws-credentials-provider.git - Run
cd aws-credentials-provider - Run the mk_ca script:
mk_ca.sh
There are now three files in the directory (~/aws-credentials-provider/CA_files).
- zk_ca.key
- The private key for the CA, used for signing CSR’s
- zk_ca.pem
- The certificate for the CA in PEM format
- zk_ca.crt
- The certificate for the CA
If you have your own private CA, then you need to register it with AWS.
Register certificate authority with AWS
Steps 1 and 6 are done on the provisioning device. Steps 2-5 must be done on the private CA.
- Copy the registration code for generating CA cert.
aws iot get-registration-code
- Create a private key for AWS CA to verify against.
openssl genrsa -out verificationCert.key 2048
- Create a CSR for your CA to sign
openssl req -new -key verificationCert.key -out verificationCert.csr
- Put registration code in the Common Name field
Country Name (2 letter code) [AU]:
State or Province Name (full name) [Some-State]:
Locality Name (eg, city) []:
Organization Name (eg, company) [Internet Widgits Pty Ltd]:
Organizational Unit Name (eg, section) []:
Common Name (e.g. server FQDN or YOUR name) []: 9c9df696a8a09688d040b4b719129e4d6dbd6a898eeb0c654af0a5753b41
Email Address []:

Please enter the following 'extra' attributes
to be sent with your certificate request
A challenge password []:
An optional company name []:
- Create a private key verification certificate for your CA. If you didn’t follow our CA creation section, then the -CA and -CAkey file paths are likely different.
openssl x509 -req -in verificationCert.csr -CA CA_files/zk_ca.pem \
-CAkey CA_files/zk_ca.key -CAcreateserial -out verificationCert.crt \
-days 500 -sha256
- Register CA certificate, set it as active and allow device certificates to auto register.
aws iot register-ca-certificate --ca-certificate file://CA_files/zk_ca.crt \
                                --verification-certificate file://verificationCert.crt \
                                --set-as-active \
                                --allow-auto-registration
Setup AWS Credentials Provider
All of these steps happen on the provisioning device
- Create an IAM role for credentials provider
aws iam create-role --role-name credential_helper --assume-role-policy-document file://aws-credentials-provider/role-trust-policy.json
- Create a role alias linked to role
aws iot create-role-alias --role-alias deviceRoleAlias --role-arn <roleARN>- The roleARN is in the output of step 1, but you can run
aws iam get-role --role-name credential_helperto find it again. - If this fails, the user you currently are may not have GetRole and PassRole permissions. The tab below gives instructions to add these permissions.
Add Permissions
- Go to AWS IAM console
- Select Users
- Select the user you currently are on your provisioning device
- Click the permissions tab
- Click Add permissions
- Click “Attach existing policies directly”
- Click Create Policy
- Click the JSON tab
- Copy the user-pass-permissions.json file into the editor
- Replace ACCOUNT_ID with your provisioning device user
- You can find this by running
aws sts get-caller-identityon your provisioning device.
- You can find this by running
- Replace ROLE_NAME with name given in the step above (e.g.
credential_helper)
- Replace ACCOUNT_ID with your provisioning device user
- Click Next:Tags
- Click Next:Review
- Name the policy
- Click create.
- Create an IoT policy which allows role alias to be assumed with a certificate
- In ~/aws-credentials-provider/iot-role-policy.json substitute:
- REGION with the desired region
- ACCOUNT_ID with the “Account” number found by running
aws sts get-caller-identity - ALIAS with the name of the role alias created in step 2
- Then run
aws iot create-policy --policy-name credentialHelper --policy-document file://aws-credentials-provider/iot-role-policy.json
- In ~/aws-credentials-provider/iot-role-policy.json substitute:
Setup the IoT device getting credentials
- Run
git clone https://github.com/zymbit-applications/aws-credentials-provider.git - Run
sudo mkdir /opt/zymbit - Run
sudo cp ~/aws-credentials-provider/credentials.sh /opt/zymbit/ && sudo chmod +x /opt/zymbit/credentials.sh - Edit
~/aws-credentials-provider/configto specify the appropriate region. - Run
mkdir ~/.aws && cp ~/aws-credentials-provider/config ~/.aws/config
Provisioning an IoT Device
- On the IoT device
- Run
openssl req -key nonzymkey.key -new -out zymkey.csr -engine zymkey_ssl -keyform e - Fill in the request with the specified values
- The IoT Policy name, we used credentialHelper.
- The desired AWS Region.
- Credential Provider URL.
- To find this, on the provisioning device run
aws iot describe-endpoint --endpoint-type iot:CredentialProvider- Copy the cxxxxxxxxxxxxx part.
- To find this, on the provisioning device run
- Role Alias name, we used deviceRoleAlias.
- The Thing name, whatever you want to name this IoT device.
- Run
Country Name (2 letter code) [AU]:
State or Province Name (full name) [Some-State]: <IOT-POLICY>
Locality Name (eg, city) []: <REGION>
Organization Name (eg, company) [Internet Widgits Pty Ltd]: <CREDENTIAL-URL>
Organizational Unit Name (eg, section) []: <ROLE-ALIAS>
Common Name (e.g. server FQDN or YOUR name) []: <THING-NAME>
Email Address []:

Please enter the following 'extra' attributes
to be sent with your certificate request
A challenge password []:
An optional company name []:
- Copy zymkey.csr from the IoT device to CA device.
- If using our CA tutorial, put csr in the aws-credentials-provider directory (~/aws-credentials-provider)
- On the CA device, sign the CSR.
- If using our CA tutorial, in ~/aws-credentials-provider, run
bash sign_csr.sh zymkey.csr device.crt. The first argument is the path to your CSR and the second argument the name you wish to give the signed device Certificate file.
- If using our CA tutorial, in ~/aws-credentials-provider, run
- Copy the device cert (device.crt) and root ca key from the CA device to the provisioning device.
- If following our CA tutorial, the root ca key is CA_files/zk_ca.pem.
- On the provisioning device, run:
sudo cp device.crt /opt/zymbit/ && sudo cp root.ca.pem /opt/zymbit/cd ~/aws-credentials-provider; bash provision-device.sh- The script will ask you a few questions, make sure everything is correct.
- The script behind the scenes will:
- Register device cert in AWS with root CA cert
- Create a IoT Thing in AWS
- Attach thing to device cert
- Attach IoT policy to device cert
- Once the script is done, transfer device.crt and root.ca.pem from the provisioning device to the IoT device.
- On the IoT device, run:
sudo mv device.crt /opt/zymbit/ && sudo mv root.ca.pem /opt/zymbit//opt/zymbit/credentials.shto test the TLS connection.- If the resulting output contains values for AccessKey, SecretAccessKey, etc, then your device has AWS credentials!
- To use Zymbit credentials with AWS CLI, set the profile flag to zymkey like so;
aws --profile zymkey iot describe-endpoint