HSM4 FAQ & Troubleshooting
Troubleshooting
Troubleshooting Checklist
Before contacting Zymbit with troubleshooting related questions, please read through the following troubleshooting checklist.
- Power supply. Most of the problems we see are from a poor power source. Start with a good power supply from the PI foundation or Canakit, not a phone charger. The recommended power for the PI4 is 5V and 3 amps. For a PI5, the recommended power supply should provide 5V, 5 amps.
- I2C enabled. Double check that you have enabled the I2C bus. An easy way to check is “ls -l /dev/i2c-1”. If /dev/i2c-1 exists, the I2C bus is enabled.
- apt update and upgrade. Be sure that your software is up to date.
- Installation. The curl script will reboot your system once completed. After the reboot, the blue LED on your Zymbit device should blink once every 3 seconds. You must get to this step before proceeding to encryption, etc.
If your issue is not related to any of the above list, read through the FAQ below to see if your issue is answered. If you still do not see a solution to your problem, reach out on our Community Forum. Thank you!
Q: Why does the LED continue to blink rapidly? It never blinks with the described pattern of once (in Development mode) or three times (in Production mode) every three seconds.
Expand for Answer
A: Check the following:
Check that the Raspberry Pi power is sufficient. The red LED on most Raspberry Pi models indicates if the Pi is being powered adequately. If it is not lit at all or flashes intermittently, try a different power supply or a different USB cable.
Make sure that you have enabled i2c support using raspi-config BEFORE your install the software. Also, when you enable i2c communications be sure to follow the enable-disable-enable sequence.
If i2c support has been enabled correctly and the HSM4 LED is still rapidly blinking, check proper physical installation of the HSM4 as detailed in this “Getting Started” guide.
HSM4 uses GPIO header pins 3 and 5 for i2c communications and pin 7 as an interrupt signal to the Pi. Pin 7 should preferably be dedicated exclusively to HSM4. Other devices may share the i2c bus with HSM4, but there may still be address conflicts. By default, HSM4 uses slave address 0x30. If the address conflict cannot be resolved on the other i2c devices, there is a way of changing the i2c address through an API call. Using this application, the HSM4 address can be changed anywhere in the ranges of 0x30-0x37 or 0x60-0x67.
Expand for API information to change i2c address
Python: set_i2c_address
C: int zkSetI2CAddr ( zkCTX ctx, int addr)
Oftentimes the 1-Wire interface relies on pin 7 (GPIO 4) for communication. If the 1-Wire interface is enabled, try disabling through raspi-config. If that resolves the problem take steps to either move the HSM4 interrupt signal from GPIO 4 or the 1-Wire interface from GPIO 4.
if the directory at /var/lib/zymbit or any of the files and/or subdirectories are corrupted or deleted, the HSM4 will fail to work. IMPORTANT: if this happens when the HSM4 is locked (i.e. Production Mode), the HSM4 can never be used again.
Q: The LED blinks rapidly when booting, but eventually turns off. It doesn’t blink once or three times every 3 seconds as described.
Expand for Answer
A: This issue could be caused by the same issues described in the first question (Why does the LED continue to blink rapidly?). Additionally, this can be caused if a locked (Production Mode) HSM4 is moved to another Pi.
Q: What do the different LED blinking patterns mean?
Expand for Answer
- 1 second very rapid flash, 1 second off, 8 slow blinks
- This indicates interrupted communications.
- 1 second very rapid flash, 1 second off, 5 slow blinks
- This indicates a failure to communicate with ATECC. The most likely cause is the HSM4 is in Production Mode, tamper detect was set to self-destruct, and a tamper detect event caused the HSM4 to self-destruct. If tamper detect is not armed, this indicates a hardware problem.
- Constant rapid blinking (waiting for host to connect)
- This indicates that you HSM4 is operational but has not bound to the host. If the HSM4 continues to blink this pattern, it could mean that there is a problem with the host Pi or that the i2c is not configured or that the i2c and wake pins are not making contact.
- Once every 3 seconds
- This indicates that your HSM4 is working and running.
- Three rapid blinks every 3 seconds
- This indicates the HSM4 is in Production Mode and is working and running.
- Rapid blinking then LED off permanently
- This indicates the HSM4 is in Production Mode but cannot bind with the RPi / SD card pair. In Production Mode the binding with a particular Pi and SD card becomes permanent. Most likely cause for this is that the HSM4, the SD card, or the PI has been swapped out.
Q: How do I set an alternative I2C address?
Expand for Answer
A: You can change the I2C address through our standard APIs:
- C:
int zkSetI2CAddr ( zkCTX ctx, int addr) - Python:
set_i2c_address
The I2C communication between the Zymkey and the Host is encrypted, but will not interfere with other devices on the same bus (assuming there is no address conflict).
Q: Why does my HSM4 fail to restart after cycling power?
Expand for Answer
A: HSM4 monitors the quality of 5V power coming into the host computer. If the voltage drops below a specified limit, even momentarily, then HSM4 will disable all security services to the host. This is a security feature to prevent power cycle and brown-own attacks. If you are powering a display, modem, or other power-hungry device from your Pi, then check the capacity and quality of your power supply. Learn more >
Q: Why is my HSM4 “invisible” to the i2c-tools suite?
Expand for Answer
A: Some people have become accustomed to using i2c-detect to do a first level check for correct installation and baseline functionality of i2c devices. However, these tools only really work if the i2c device communicates via a protocol that sits on top of i2c called SMBus or SMB (System Management Bus). Instead, HSM4 communicates to the host at a much more fundamental level, in part because the HSM4 protocol traffic is encrypted.
You can tell if you successfully installed it by observing the blue LED. If it is flashing once every 3 seconds, then binding completed. You can also use the systemctl command. It should say “active (running)”:
systemctl status zkifc
Q: If the install fails, can I run it more than once?
Expand for Answer
A: Yes, you should have no problem running it multiple times if it were to fail.
Encrypting Root File System
Summary of steps
- Start with a blank USB device.
- USB storage should be twice the size of the SD card.
- The process for encrypting the SD card stops zkifc. The blue LED will flash rapidly during the encryption process. It will return to blinking once every 3 seconds when complete.
- The process will automatically do two reboots. Be patient.
- If the encryption process does not complete, it’s best to start fresh and try again.
Q: How can I check if the system matches the default parameters?
Expand for Answer
A: lsblk will show you the partitions. Look for the name of your / partition (default is mmcblk0p2) and the USB device (default is sda). Example output:
NAME         MAJ:MIN  RM   SIZE  RO TYPE  MOUNTPOINT
mmcblk0      179:0    0   14.9G   0  disk
|-mmcblk0p1  179:1    0    256M   0  part   /boot
`-mmcblk0p2  179:2    0   14.6G   0  part   /
sda            8:0    0   32.0G   0  disk
|_sda1         8:1    0   32.0G   0  part
Q: How can I monitor the status after phase 1 reboot?
Expand for Answer
A: Once you get to the second phase and login, you can monitor progress with
journalctl -fu cfg_SD_crfs
That will show you progress of the second half of the encryption process.
Q: Can I re-run encryption with the same USB stick?
Expand for Answer
A: The script is designed to re-use information on the USB stick to encrypt a “golden” image in production on more than one device. If the file original_zk_root.tgz exists on the USB stick, it will use that file and skip the step of creating a whole new tarball of the rootfs. If you truly want to start over, start by reformatting/erasing your USB stick.
Q: If my PI automounts the USB device, will that interfere with the process?
Expand for Answer
A: The script attempts to unmount the external device, but in some cricumstances the device may stay mounted and the process will fail. You will get a message either on your screen or in journalctl -fu cfg_SD_crfs during the second phase indicating the drive was already mounted. Unmount the drive and try again.
# Check /dev/sda* mount points for devices mounted to /media/*
lsblk

# if mounted, unmount
sudo umount /media*

# re-run service
sudo systemctl restart

# monitor progress
journalctl -fu cfg_SD_crfs
Q: How can I confirm my file system is encrypted and protected?
Expand for Answer
A: Since zkifc is stopped during the process, the blue LED will flash rapidly until the whole process completes. Once both of the automautic reboots are completed, the blue LED will return to flashing once every 3 seconds.
lsblk will show you that you now have a “cryptrfs” partition under your mmcblk0p2 (default)
df -h will also show “/dev/mapper/cryptrfs” for the “/” file system.
If your system reboots twice, the LED returns to flashing once every 3 seconds, and lsblk displays a “cryptrfs” partition, you can be confident your system is encrypted and protected.
For more help, see Zymbit’s Community Forum.
Features
Q: What curves are supported for Zymbit products?
Expand for Answer
Zymkey and HSM4: NIST P-256 and secp256r1
HSM6: NIST P-256, secp256r1, secp256k1, X25519, ED25519
Q: How do I use HSM6’s store_foreign_public_key function to store a Zymkey or HSM4 public key on HSM6?
Expand for Answer
A: The easiest way is to save the HSM4 key directly to a binary file, copy that file to the HSM6 and read in the binary file.
HSM4 side:
#!/usr/bin/python3
import zymkey

# Get the public key from slot 0 and save it in a file
pub_key_file = '/tmp/pub_key_slot0'
slot = 0
key = zymkey.client.get_public_key(slot)
with open(pub_key_file, "wb") as f:
    f.write(key)
copy /tmp/pub_key_slot0 over to the HSM6 PI
HSM6 side:
#!/usr/bin/python3
import zymkey

key_file = "/tmp/pub_key_slot0"
key = open(key_file, "rb").read()
# Store the key in the foreign key store
foreign_slot = zymkey.client.store_foreign_public_key('secp256r1', key)
Q: How can I reset the clock to the current timestamp?
Expand for Answer
A: The clock will sync to the current timestamp once the Pi has achieved NTP sync. This requires you to have access to the Internet.
Q: How do I access the devices (RTC, accelerometer, crypto) on HSM4?
Expand for Answer
A: For Zymkey and HSMs, kernel drivers and libraries for all of the devices are included in the Zymkey software package via the APIs.
Q: My GPG Key expired and I cannot access the Zymkey Repository. How do I update the Key?
Expand for Answer
A: You can update your existing key with the following command:
curl -L https://zk-sw-repo.s3.amazonaws.com/apt-zymkey-pubkey.gpg | sudo gpg --dearmor --yes -o /usr/share/keyrings/zymbit.gpg
Q: Can the HSM4 detect if the SD card has been removed?
Expand for Answer
A: No, but perimeter detect can be configured to prevent access to the SD card. When a tamper event is detected, the HSM4 will, when properly configured via the API, destroy all critical key material and the root fs will fail to be decrypted upon boot.
Battery & Power Questions
Q: Should I use an external battery on my Zymkey or HSM?
Expand for Answer
A: The following table compares Zymkey and HSM operational modes while connected to Main Power, Battery Power, and No Power.
The battery is required to maintain the Real Time Clock and the perimeter detect circuits when the host power is removed. Without the battery, these two functions will not be active when the host power is removed.
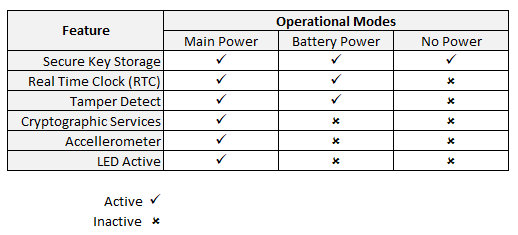
Q: What happens when the battery dies? How can I change the battery when it dies, without self-destructing my device?
Expand for Answer
A: If the battery dies and the host is not connected to power, some features will go out, such as Perimeter Detect and Real Time Clock. See the table below for more information.
With Zymkey and HSM4, if tamper detect is enabled and the battery dies or is removed, the device will self-destruct. This is an intentional security feature. If tamper detect is NOT enabled, you should connect the host device to power to change the battery.
HSM6 has a battery monitoring feature to help the user prevent the battery from dying. If the battery dies, HSM6 users have the ability to choose whether the device should self-destruct or hold in reset mode until the battery is changed.
Kernel & Kernel Boot Questions
Q: Can you tell the kernel not to run a shell?
Expand for Answer
A: Someone could easily replace the kernel and, while it is possible to configure initramfs to not permit the busybox shell to, that can be sidestepped as well. Even if you hack your own changes to the kernel to ignore the init option, someone could replace your kernel. Also, kernel updates would have to be done manually and the updates from the apt repo would have to be blacklisted.
Q: Can you tell the kernel to ignore cmdline.txt?
Expand for Answer
A: There are many reasons why this is infeasible, but the main one is that, since the GPU initially functions as a bootloader processor during boot and since Broadcom has not made the GPU compiler publicly available as well as the source code for the bootloader, one cannot simply compile their own code that would ignore cmdline.txt.
Q: Is it possible to encrypt the boot partition?
Expand for Answer
A: No because the GPU bootloader does not have encryption features implemented and, even in lieu of that, it does not know how to communicate with HSM4. The best solution, then, would be to implement an independent secure boot procedure. As mentioned above, we are currently working on adding this feature in a future product.
Production (“self-destruct”) Mode Questions
Q: When using the perimeter-detect feature, does the “self-destruct” mode work (destroy all of its key material) even when the Lock Tab hasn’t been cut?
Expand for Answer
A: Self-destruct mode works only after the Lock Tab has been cut.
Q: Is there a way to turn off “self-destruct” mode?
Expand for Answer
A: No, once turned on, “self-destruct” mode is permanent.
Q: If my HSM4 does “self-destruct,” can I create new keys and reuse the hardware?
Expand for Answer
- The SBC and SD card hardware will be reusable.
- Because the SD card contents are encrypted and the decryption key was destroyed, the data is lost.
- The HSM4 will not be reusable because the key slots will be destroyed.
Q: If I cut the Lock-Tab on a HSM4, can I move that HSM4 to another Pi or change the SD card?
Expand for Answer
A: No. Cutting the Lock-Tab permanently binds that instance of HSM4 to the specific instances of host computer and SD card. This is a security feature to prevent credentials being moved from one host to another. DO NOT cut the Lock-Tab if you are still in development and expect to change the host or SD cards.
Q: Will HSM4 still self-destruct, even when my SBC is powered off?
Expand for Answer
A: Yes, because HSM4 is battery powered. As long as the battery is sufficiently charged, it will still self-destruct.
Other
Q: Where can I learn about and/or pre-order future products?
Q: Which SBCs are compatible with HSM4?
Expand for Answer
- Electrically, the Zymkey-I2C will interface to any single board computer using I2C. Check compatibility with your particular Linux distribution.
- Raspberry Pi 3, 3B+, 4, Zero
- RPi Compute Module 3, 4
Q: Does HSM4 work with Arduino?
Expand for Answer
A: We have no plans to release an Arduino shield version. While we love Arduinos and use them all the time, they generally don’t have enough resources to handle cryptographic operations at this level.
Q: Does HSM4 work with BeagleBone?
Expand for Answer
A: Zymbit does not officially support the BeagleBoard platform at this time.
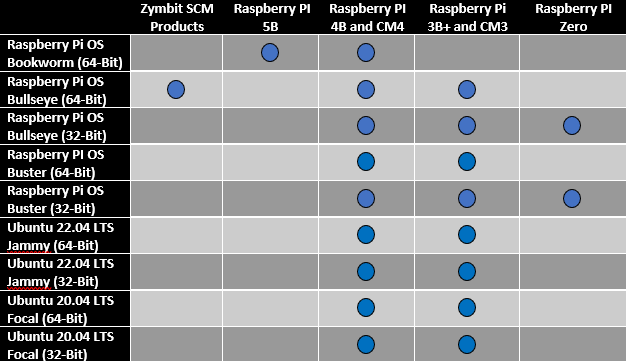
Q: Which operating systems does HSM4 support?
Expand for Answer
Q: How much power does HSM4 consume?
Expand for Answer
- HSM4-RPi (3.3V): idle approx. 1mA; max active < 25mA with LED off, < 35mA with LED on.
- HSM4-USB (5V): idle approx. 1.5mA; max active < 40mA with LEDs off, < 60mA with LEDs on.
See Power Quality for more information.