ZYMKEY5: Quickstart and Integration
ZYMKEY5 is the essential Zymbit security module designed specifically to work with Raspberry Pi. It connects to the GPIO header of the SBC and uses the I2C bus and GPIO4 as a WAKE_PIN to communicate with the SBC CPU via an encrypted channel.
In this Getting Started guide we describe how to install your ZYMKEY5 to a Raspberry Pi running Raspberry PI OS or Ubuntu. The installation process is the same for both of these Linux distributions.
The ZYMKEY5 occupies 10 pins on the GPIO header. It can also be used with other GPIO devices attached, or other I2C devices attached. The correct address range and use of IO pins will be described in this guide as well.
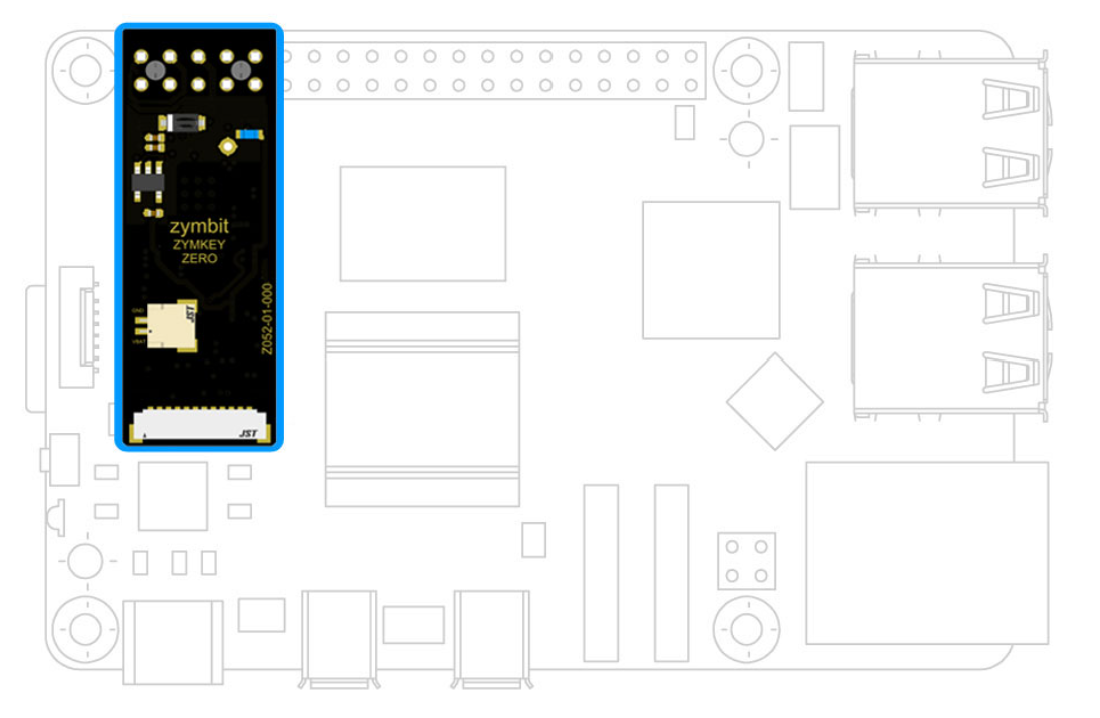
The ZYMKEY5 hardware showing the location of the GPIO header and other connectors.
The pinout of the header of the ZYMKEY5. ZYMKEY5 requires exclusive access to 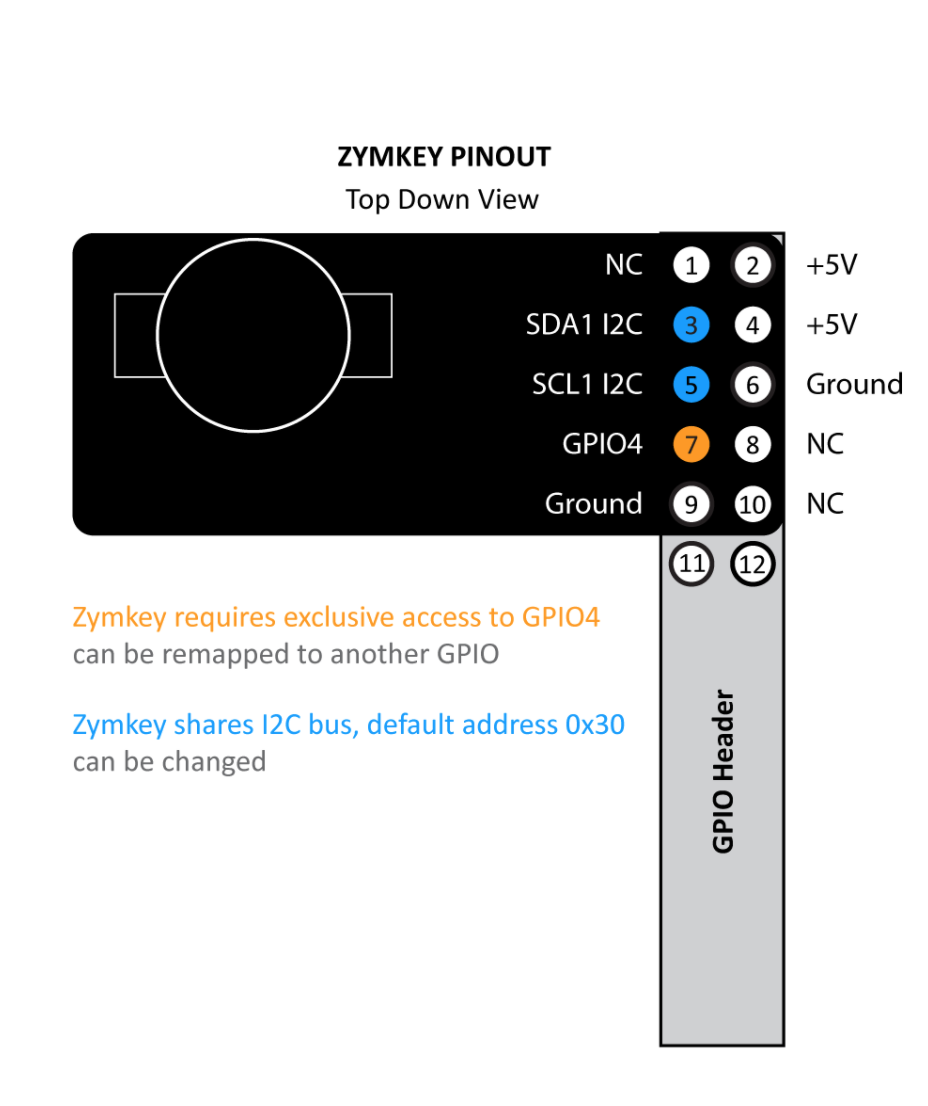
GPIO4, which can be remapped to another GPIO pin. It also share the I2C bus with the default address of 0x30.
Summary of Setup Steps
- Installing the hardware
- Connect the external battery to the ZYMKEY5, and connect it to the host single-board computer (SBC). The battery connector is a 1.00mm Pitch, 2-pin, JST PCB header that mates with housings with SHR-02V-S-B or similar headers. It takes 3.3V batteries and is used to power the RTC on the ZYMBIT SCM as well as power the security supervisor on the SCM in a low-power state when there is no primary power.Install the battery on the ZYMKEY5,
- Establish an I2C connection
- Enable the I2C bus on the host device in order to be able to communicate with the ZYMKEY5.
- Install the Zymbit Driver Package
- These utilities provided by Zymbit are necessary to interact with the hardware module.
- Test the installation
- Your ZYMKEY5 is now temporarily bound to your SBC and ready for use in developer mode.
Installing the hardware
Battery Installation
Connect an external battery to the ZYMKEY5, and connect it to the host single-board computer (SBC). The battery connector is a 1.00mm Pitch, 2-pin, JST PCB header that mates with housings with SHR-02V-S-B or similar headers. It takes 3.3V batteries and is used to power the RTC on the ZYMBIT SCM as well as power the security supervisor on the SCM in a low-power state when there is no primary power.Install the battery on the ZYMKEY5,
Hardware Installation
Installing your hardware correctly is important to avoid destroying your Pi or ZYMKEY5. Be sure to follow the instructions below carefully. In particular:
- Pay close attention to the images below to ensure the SBC’s GPIO pins are properly aligned with the ZYMKEY5’s header.
- Ensure that your Raspberry Pi is powered down before proceeding.
- Ensure that the coincell battery (if installed) is installed with the positive side (marked with
+) facing upward.
Before installing
Power off your Raspberry Pi to ensure that neither the Pi or the ZYMKEY5 are damaged.
Attach hardware
Press down firmly on the ZYMKEY5 to connect it to the GPIO pins of the Raspberry Pi. The ZYMKEY5 should fit relatively snug and maintain a tight interference fit around the pins. Hold the ZYMKEY5 with the LED and battery holder facing upward. Then, carefully align the ZYMKEY5’s connector with the first 10 GPIO pins of the Raspberry Pi.
The ZYMKEY5 occupies 10 pins on the GPIO header. If the header of the ZYMKEY5 isn’t properly aligned with the GPIO header of the Raspberry Pi, both devices could be damaged.
Power on and confirm operation
After you have connected the hardware and are sure that the pins are properly aligned, power up your Raspberry Pi. You should see a blue LED blinking rapidly and consistently (5 blinks per second). This confirms that your ZYMKEY5 is operation but unconfigured.

If the blue LED blinks erractically, or not at all, then there is an installation error and you should check the connections.
Establish an I2C connection
For Raspberry Pi operating systems, you must configure the state of the I2C.
- Log in to your Raspberry Pi and run
sudo raspi-config. - Navigate to
Interfacing Options->I2C->Would you like the ARM I2C interface to be enabled? - Select yes, and confirm this choice.
Your I2C bus is now configured and ready to talk to the ZYMKEY5. The default I2C address for the ZYMKEY5 is 0x30. NOTE: The ZYMKEY5 will not show up in the display of tools such as i2cdetect. This is by design.
Install the Zymbit Driver Package
Login to your host device and follow these steps to install the ZYMKEY5’s Zymbit Driver Package.
The ZYMKEY5 will require a number of packages to be installed from the Raspbian and Zymbit apt repositories. The following setup script will be install a number of files and software packages on your system, including:
- Zymbit
.servicefiles located in the/etc/systemd/systemdirectory pip
Ensure that curl is installed on your host:
sudo apt install curl
Download and install the necessary Zymbit services onto your device.
curl -G https://s3.amazonaws.com/zk-sw-repo/install_zk_sw.sh | sudo bash
Test the installation
When the software installation has completed, reboot your device. After the reboot has completed, the Raspberry Pi will perform an operation that will temporarily bind the ZYMKEY5 to your SBC. Once the ZYMKEY5 is bound to the SBC, the ZYMKEY5’s blue LED should blink slowly–once every 3 seconds–to indicate that the binding is complete.
The quickest way to get started is to see the ZYMKEY5’s various features at work by running some example test scripts.
Run the scripts:
python3 /usr/local/share/zymkey/examples/zk_app_utils_test.py
python3 /usr/local/share/zymkey/examples/zk_crypto_test.py
Now you’re ready to start developing with ZYMKEY5 and Raspberry Pi. When it’s time to deploy your project, read our guide on enabling Production Mode: