Getting Started
Quickstart - Download and Install Bootware Software
In this Getting Started guide we describe how to bring up a common use case for Bootware - A/B partitioning for fallback and recovery.
The default SCM/SEN as shipped has Zymbit software pre-installed. The Zymbit product should be up and running with the blue LED flashing once every three seconds. All of the default images will have a hostname of zymbit-dev and a login of zymbit/zymbit. Change the hostname and login during your development.
An HDMI console is highly recommended for setting up your unit with Bootware. The process of repartitioning and loading takes time and the console is handy for monitoring progress.
Details of the commands in this Quickstart are linked in line. See the Features section for more information on how to use Bootware.
Overview of steps to get up and running
- Download the Bootware tools package and untar. Run zb-install to install the Bootware tools
- Run zb-imager to create and sign a Zymbit image file (zi image) of your current root file system as a backup.
- Run zb-wizard to configure Partitions and Recovery strategy. For this Quickstart, we will setup A/B partitions.
- Run zb-update to load a known good example zi image into the Backup (B) partition; set B to as the Active partition.
- Use the “-r” option to force a Rollback to your original partition to verify your A/B setup is working.
1. Download Bootware
Download the Bootware software to the SCM. The Bootware software can be downloaded with curl:
curl https://bootware.s3.amazonaws.com/bootware-1.0.tgz --output bootware-1.0.tgz
Once the tar file is downloaded, untar:
tar xvzf bootware-1.0.tgz
The contents will be extracted into bootware-1.0. Files extracted:
| Item | Description |
|---|---|
| zb-install.sh | Shell script to install Bootware tools |
| scripts/ | Scripts and configuration files for Bootware |
| zboot_artifacts/ | zboot executable and boot artifacts |
| zb-uninstall.sh | Shell script to uninstall Bootware tools |
Run the following install script on the SCM to install the zboot utilities:
cd bootware-1.0
sudo ./zb-install.sh
Installing zboot tools...
Reading package lists... Done
Building dependency tree... Done
…
Installing zboot...
Done!
After installing the zboot tools. A reboot is required. Reboot now? (Y/n)
Reboot to complete the installation process. The process takes two reboots. Once completed, all necessary files required for loading new images via zboot will be installed. The install process will change the boot sequence to use u-boot and Zymbit’s zboot, but does not alter your filesystem.
2. Run zb-imager to create Bootware-ready Zymbit Image backup (zi image)
Bootware requires images in a secure, signed format for loading with zboot. An image conversion tool, zb-imager, creates the zi image. zb-imager can take a snapshot of your running system or input can be tarballs of your /boot and /rootfs partitions. Images can also be partial file additions and deletions called Overlay images.
If you are Developing on a CM4 directly and need to transition to the SCM, See Developing on the CM4 for instructions on how to create an image from your CM4 to load onto the SCM.
Create a zi image backup from your current running root file system
Use zb-imager to create a Zymbit Image (zi) backup of your current running system. Once created, the zi image can be propagated to other disk partitions securely. A Private/Public key pair will be used for signing the zi image at time of creation and verifying at time of loading onto a new partition. Key pairs can either be created in software or using the Zymbit HSM hardware. For this Quickstart, we will use software keys. Details on signing and verifying can be found here.
sudo zb-imager
Make the following selections:
| Item | Description |
|---|---|
| Image Type? | Choose 1. for a Full Image |
| Name of Image?: | Any name. Ex. myImage. Name of the converted output file. A zi extension will be added to the name. |
| Version?: 1.0 | Optional. An arbitrary version number for your reference. |
Next, you will be prompted for Signing Keys. Keys can be Software or Hardware based. You can use an existing key or the script will create keys for you. For this Quickstart, we will assume you need to generate Software keys,
| Item | Description |
|---|---|
| Use software-based keys? | Yes |
| Key? | 1. Create new software key |
The zb-imager script will now build your zi image.
The imager takes 20 minutes or longer depending on the size of your file system. Once completed, the zi image and Private/Public key will be saved in /etc/zymbit/zboot/update_artifacts/output/. Keep your private key private. The zi image can be copied to either a local storage device such as a USB stick or a remote server accessible via HTTPS. The public key file will be needed to load the zi image.
Additional examples of zb-imager usage can be found here: zb-imager usage
3. Run zb-wizard to configure the Partitioning and Image loading
For this quickstart, we will use a known-good zi image. We’ve converted the pre-installed base image on the SCM to the zi format. We will configure the zi image to be accessed remotely via HTTPS.
If you wish to run from a local source such as a USB stick, our example image can be downloaded from here:
For bullseye,
curl https:///bootware.s3.amazonaws.com/zymbit_bullseye.zi --output zymbit_bullseye.zi
For ubuntu,
curl https:///bootware.s3.amazonaws.com/zymbit_ubuntu.zi --output zymbit_ubuntu.zi
You will need the corresponding public key in order to verify the downloaded image. The public key in PEM format for either the bullseye image or the ubuntu image can be downloaded here:
curl https:///bootware.s3.amazonaws.com/pub_key.pem --output pub_key.pem
Use the Bootware Wizard to Configure your System
Bootware includes a tool to help configure your system called zb-wizard. zb-wizard is meant to setup your device environment to load a zi image from a configured endpoint and the update policies for how to apply those updates. More information on zb-wizard can be found here.
We are going to configure with A/B partitioning to have a stable backup partition for fallback. To start the wizard,
sudo zb-wizard
Choose your settings as described below.
Choose your options, save and exit.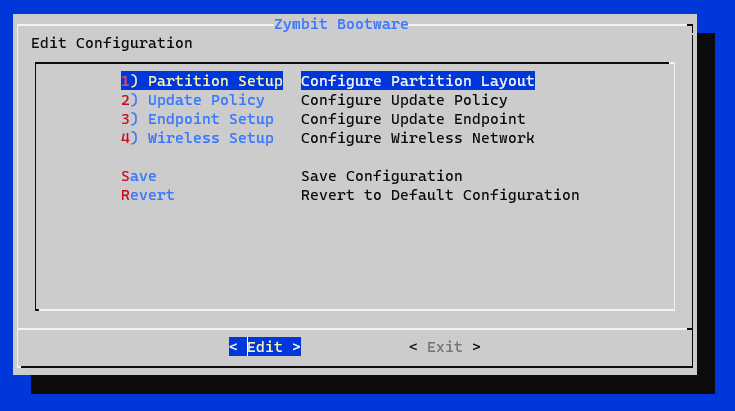
Partition Setup – Specifies the device partition layout after an update. The root file system will be re-partitioned with your chosen configuration. Filesystem sizes estimates are based off of 32GB CM4s. Choose the recommended Option 3 A/B.
- 3 A/B – RECOMMENDED This will take the remaining disk space available after the boot partition and create two encrypted partitions, each taking up half of the remaining space (around 14.4 GB).
Update Policy – The update policies define if image updates are applied to the Backup, Active, or Both partitions. Choose the recommended Option 1 - Backup. This way you know you have a good Active partition for fallback.
Endpoint Setup – The configured endpoint with .zi image. The endpoint can be either an HTTPS URL or a local external mass storage device like a USB stick or nVME drive. We are going to use the URL of our known good image:
For bullseye,
https:///bootware.s3.amazonaws.com/zymbit_bullseye.zi
For ubuntu,
https:///bootware.s3.amazonaws.com/zymbit_ubuntu.zi
If you opted to download one of the zi images to a local device, enter the device endpoint name instead.
/dev/sda1
zb-wizard will attempt to verify the zi image is reachable.
Wireless Setup – Bootware supports pulling updates via Wifi or LAN connections. Wifi credentials need to be provided in order for bootware to access the wifi during updates. If no wireless credentials are provided, the wireless interface is disabled in zboot.
Save and Exit to exit zb-wizard.
4. Run zb-update to create the Backup partition and load the zi image.
Once you have completed using the Wizard to configure your Bootware, run zb-update to complete the process of repartitioning and loading your image.
sudo zb-update
The script will show your configuration for review and confirmation and give you the option to change the configuration.
| Parameter | Setting | Notes |
|---|---|---|
| update_endpoint | https://bootware.s3.amazonaws.com/zymbit_bullseye.zi | or zymbit_ubuntu.zi for ubuntu |
| endpoint_type | HTTPS | if you are using a local endpoint, adjust, e.g. /dev/sda1 |
| one_root_fs | false | We are using A/B: two root partitions |
| update_mode | UPDATE_BACKUP | We are only going to load the image onto the BACKUP partition |
| resize_a | false | We are not going to make one big A partition. We are making an A and B |
Hit return or Y to start the download process.
Once completed, zb-update will ask you to confirm the name of the image, and the verification public key information. For this example, that will be the software-based public key PEM file downloaded earlier.
| Parameter | Setting | Notes |
|---|---|---|
| Use software-based keys for verifying | Y | Use software keys |
| Existing key path? | pub_key.pem | Adjust if not downloaded to your local directory |
The script will prompt for a reboot to complete the process.
zboot Boot Process
The Bootware boot process will now take place. zboot will boot your system. Upon reboot, an encrypted B partition will be created and the zi image will be loaded onto B. The A partition will remain untouched.
On the console, you will see:
- “Loading: Encrypted zboot please wait…” message, which takes around 4-5min.
- The B partitions will be configured and setup for LUKS encryption protected by the Zymbit SCM
- It will then take a few minutes to get/unpack tarballs from the image, and verify the signature
- It will take some time to unpack the image into the B root partition, depending on the size of the image.
- Once it’s done unpacking the image to the B partition, it will boot into the B partition as the ACTIVE partition. You can use
lsblkto examine the partitions.
4. Quickcheck - Force Failover (Change Active/Backup partitions)
To verify you now have your A partition intact, force a failover from Active to Backup with the -r option to zb-update
sudo zb-update -r
You should now have Active and Backup partitions with working images ready for your development.